Adjustable and Automatic Welding Helmet EN175 EN379
- Product Code: SSCREEN
- Availability: ring for stock
-
£37.80
Lowest price
EXCL VAT - £45.36 inc. VAT


| 1+ |
|---|
| £45.36 (£37.80 ex. vat) |
| Pack Size | Qty |
|---|
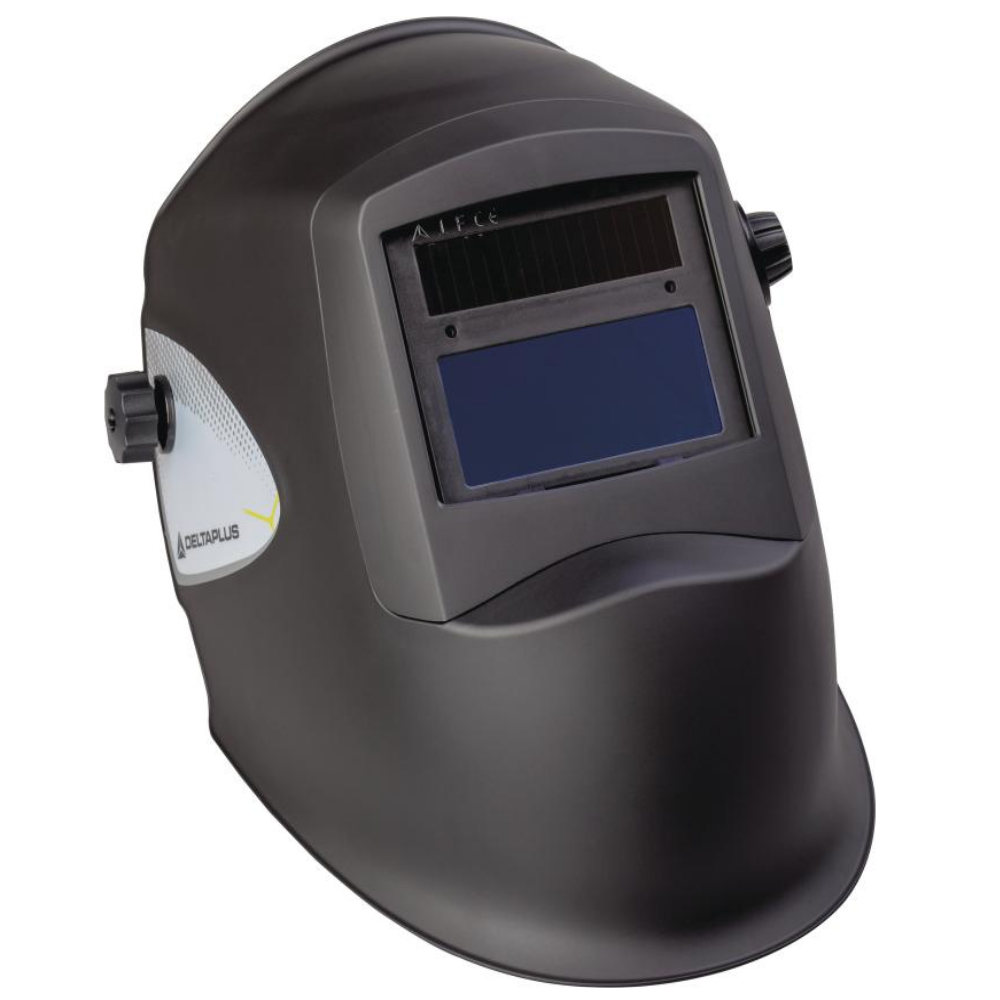
Deltaplus SCREEN Helmet for electric arc welding with self-obscuring screen.
Can be used for MIG, MAG, TIG and plasma welding requiring DIN9 to DIN13 shade protection.
EN ELECTRIC ARC WELDING SHIELD (OPTO-ELECTRONIC)
SCREEN: HELMET FOR ELECTRIC ARC WELDING, MIG-MAG, TIG - DIN 9-13 SCREEN PLATE:
The SCREEN optoelectronic welding shield comprises the SCREENHL helmet and the SCREENLQ LCD auto-darkening solar lens.
SCREEN offers complete protection of the head and eyes against ultraviolet and infrared rays emitted during welding operations.
The lens can be switched from the clear state (shade 4) to dark states (shades 9 to 13).
SCREEN may be used for all welding work but should NOT be used as protection against oxy-acetylene cutting (blowtorch) and laser welding.
You can adjust the headgear assembly using its button (press and rotate) to tighten to fit your head size.
For a finer adjustment of your field of vision you can also modify the position of the stud located under the left and right-hand screw of the headgear assembly.
The LCD lens is equipped with 3 adjustable wheels. For optimum performances of the shield
▪Sensitivity button:
Use it to adjust the filter to different light levels in various welding process. We recommend a Mid-range sensitivity setting for most applications.
Set sensitivity according to lighting condition: At position "LOW" when the surrounding light is bright and at position "HI" when the surrounding is dim.
Select sensitivity according to welding current: At position "LOW" during high current welding and at position "HI" during low current welding.
▪Scale or shade number, (SHADE NO) button:
Adjust the shade according to the intensity of the current & the welding process you are using.
The darkest shade is 13, the lightest is 9. Adjust the button according to the desired shade (PART1 TABLE 3 under technical tab).
▪Switchover time, (DELAY) button:
Adjust the delay button to an appropriate position.
The switchover time is about 0.6s. Position “I” indicates that there is little reaction time, i.e. there is no or relatively little time between the dark and clear state.
This position is mostly used for spot welding. Note: the two other positions “-” and “+” indicate respectively a fast “-” or slow “+” reaction time.
The fast reaction time is about 0.2 second; the slow reaction time is about 1 second.
You can adjust the desired switchover time, within this range, according to your conditions of use.
The ADF filter uses two CR2450 lithium batteries.
Click to download Declaration of Conformity SCREEN.pdf
USER INSTRUCTIONS
 EN ELECTRIC ARC WELDING SHIELD (OPTO-ELECTRONIC)
SCREEN: HELMET FOR ELECTRIC ARC WELDING, MIG-MAG, TIG - DIN 9-13 SCREEN PLATE:
PACK OF 5 EXTERIOR SPARE SCREENS FOR SCREEN HELMET
Use instructions:
Read these instructions carefully before using your Optoelectronic welding shield. In order to ensure that this product meets your needs,
it should be used and maintained correctly, as indicated in this manual.
The SCREEN optoelectronic welding shield (SCREEN reference) comprises the SCREENHL helmet and the SCREENLQ LCD auto-darkening solar lens.
SCREEN offers complete protection of the head and eyes against ultraviolet and infrared rays emitted during welding operations.
The lens can be switched from the clear state (shade 4) to dark states (shades 9 to 13).
SCREEN may be used for all welding work but should NOT be used as protection against oxy-acetylene cutting (blowtorch) and laser welding.
It is very important to read these instructions carefully and to comply with the various stages of use described below, at the risk of incurring serious eye injury.
▪1 CONTROLS:
Before using the optoelectronic welding shield for the first time, it is important to:
Examine the product carefully and check its marking.
Ensure that the product was manufactured by Delta Plus Group, that the helmet is marked SCREENHL and that it is fitted with its LCD lens marked SCREENLQ
Examine the product carefully and ensure there is no damage, including on the inner and outer faces of the LCD screen, its solar sensor, its shell as well as its harness;
The sensors should be kept clean and unobscured.
Ensure that the whole product and its accessories are properly assembled and ready for use (see diagrams)
Check the operation of the product by putting it as close as possible to an electric arc.
It should switch automatically from the clear to the dark state, otherwise it is damaged
Remove the protective film before initial use.
▪ 2 Assembly:
If you need to dismantle your SCREEN product and then reassemble it, refer to drawing. The product should be assembled carefully
(do not omit or leave any parts unassembled):
Mount the headgear assembly; Fit the LCD lens in place. The SCREEN model is equipped with a SCREENLQ reference LCD lens;
The protective screen should be fitted in front of the welding shield in front of the LCD lens.
The outer face of the LCD lens should not come into direct contact with the welding arc.
To install flatten it into the slock and put on the 2 fastener pieces (from inside to outside of the mask), then screw them in.
▪ 3 Adjusting the SCREEN HL reference helmet:
You can adjust the headgear assembly using its button (press and rotate) to tighten to fit your head size. Then try on the shield before using it for work.
For a finer adjustment of your field of vision you can also modify the position of the stud located under the left and right-hand screw of the headgear assembly.
▪(4/ Adjusting the SCREEN LQ reference LCD lens:
The LCD lens is equipped with 3 adjustable wheels. For optimum performances of the shield it is important to adjust them properly, according to your work conditions.
The three functions are the shade adjustment to the dark state, switchover time and sensitivity:
▪Sensitivity, (SENSITIVITY) button:
Use it to adjust the filter to different light levels in various welding process. We recommend a Mid-range sensitivity setting for most applications.
Set sensitivity according to lighting condition: At position "LOW" when the surrounding light is bright and at position "HI" when the surrounding is dim.
Select sensitivity according to welding current: At position "LOW" during high current welding and at position "HI" during low current welding.
▪Scale or shade number, (SHADE NO) button: Adjust the shade according to the intensity of the current & the welding process you are using.
The darkest shade is 13, the lightest is 9. Adjust the button according to the desired shade (PART1 TABLE 3).
▪Switchover time, (DELAY) button: Adjust the delay button to an appropriate position.
The switchover time is about 0.6s. Position “I” indicates that there is little reaction time, i.e. there is no or relatively little time between the dark and clear state.
This position is mostly used for spot welding. Note: the two other positions “-” and “+” indicate respectively a fast “-” or slow “+” reaction time.
The fast reaction time is about 0.2 second; the slow reaction time is about 1 second.
You can adjust the desired switchover time, within this range, according to your conditions of use.
You should be noted the conditions in which your LCD filter is to be used (PART1 TABLE 3)
▪(5/Minimal strength: The welding helmet complies with the minimum strength requirements of the standard EN175:1997
▪(6/ Replace batteries: The ADF filter uses two CR2450 lithium batteries. You should change the battery immediately when the light indicative LOW BATTERY is on.
Open the 2 battery compartments in the direction indicated above (see diagrams). Replace old batteries with new ones. The anode (+) battery must remain at the top.
Insert the 2 compartments, then check that the LCD filter functions correctly.
PART1 :
TABLE1:
(10) SCREENHL reference helmet features. (11) Window size / (12) Maximum size of space for lens / (13) Outer protection plate size /
(14) Inner protection plate size / (15) Materials: / (16) Weight /(17) Temperature of use ->
TABLE2:
(20) SCREENLQ reference LCD lens features / (21) Overall size / (22) Field of vision size / (23) Solar sensor size / (24) Material shell / (25) Weight /
(26) Resistance to radiation / (27) Maximum transmission rate in ultraviolet (313-365nm) ≤ 0.0044‰ /
(28) Maximum transmission rate in infrared (780-1400nm) : shade 5 ≤ 3.2%/ shade 9 ≤ 0.2%/ shade 13 ≤ 0.014% (29) On - Off /
(30) Automatic on – off control (Auto On / Auto Off) / (31) Shade / (32) Clear state: 4 / (33) Dark state: adjustable from 5 to 9 /adjustable from 9 to 13 /
(34) Switching speed / (35) ≤ 0,00004s (from clear to dark state) / (36) Switching time / (37) ≤ 0.1s (reaction time), applicable to spot welding. Adjustable from 0.15 to 0.80s /
(38) Temperature of use. ->
TABLE3:
(1) Scale numbers (shades to use) per field of application. (2) Current intensity / (3) (Ampere- A) / (4) MIG on heavy metals / (5) MIG on light metals. /
(6) The expression “heavy metals” includes steels, alloy steels, copper and its alloys, etc.
Immediately superior or inferior shade numbers can be used depending on the conditions of use;
The empty fields correspond to ranges of use that are not normally used for the corresponding application type.
Usage limits: Do not use for applications other than those for which it has been designed.
If the LCD lens does not darken when you use it, if there is no reaction during welding, if the lens flashes and/or is unstable, if the lens darkens but returns to the clear state,
then the LCD lens may be damaged. It should not be used.
Contact us and replace it immediately; If the LCD lens shatters or can no longer switch from the clear to the dark state when you use it, change it immediately;
Never use a damaged screen;
Do not modify this product, only use the accessories designed for it. .
Dress appropriately with welding clothes, gloves and non-slip shoes. Avoid wearing jewellery and loose clothing: Keep out of the reach of children;
Parts which may come into contact with wearer's skin and could cause allergic reactions to susceptible individuals.
The LCD lens shall only be used in conjunction with a suitable backing ocular; Read the instructions and the markings on the products carefully.
Attention: The above warnings and precautions for use cannot cover all possible situations.
The user should be aware of the risks run and should use his best judgement and always remain vigilant.
Storage/Cleaning instructions: Store the equipment dry and clean in its original packing, away from light, cold, heat and humidity and at ambient temperature.
Keep the photoelectric cell clean; After use check the protective screen., all scratched or damaged oculars should be replaced.
Clean and disinfect using warm soapy water or neutral detergent. You can wipe it, if necessary, with a soft clean cloth or clean with a mild detergent or alcohol.
Do not use abrasive cloth ; The protective screen might be damaged (scratches / cracks). It should then be replaced (SCREENPPIN reference).
Remove the protective film before replacing it;
Your product should be checked regularly by qualified people.
This product should provide proper protection for 5 years after the first usage, in correct conditions of maintenance and storage.
However, this lifetime is given as an indication and could vary depending on conditions of use and storage.
